
First of all, let’s remember again: Combu server does not use a real-time protocol but relies on HTTP that is an asynchronous protocol. This means that the clients call specific scripts on server and receive response but not the other way (the server doesn’t send data to clients by its own, the web server runs in a connectionless environment), and it doesn’t need to be real-time since its only purpose is to be the back-end for your app.
So in a real-time multiplayer environment you will need to use Combu along side with a real-time framework like UNET or Photon (we have a free sample to use together with Photon in the official page of Combu).
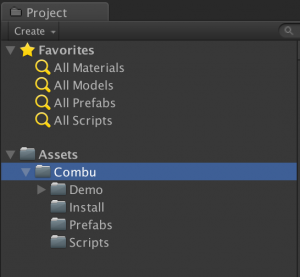
New empty project
Let’s start by launching Unit, create a new empty project and import the Combu package, you should have a folder hierarchy similar to this screenshot:
Web Server and Database
Combu server consists of PHP scripts that you must upload to your production server when you are ready to publish. During the development you can use a web server installed on your local machine, on Windows you could use IIS (Internet Information Services) or install the open source multi-platform kit XAMPP, while OSX and Linux systems have usually installed Apache by default so please refer to your system documentation to know the location of the web server root (or install XAMPP).
Requirements
Since version 3.0 and later it’s required minimum PHP version 5.5 or later. For version 2.x you needed also to edit the file php.ini of your web server to enable the setting short_open_tag (short_open_tag=On). You also need to have enabled the following PHP modules: SimpleXML (used in the database tables creation), zip and zlib (used in the server auto-upgrade feature).
To check your PHP version and the activation of the required PHP modules listed above, you can create a file on your server (for example phpinfo.php) with the following content:
<?php
phpinfo();
You should see in your browser a page with all the detailed informations about your PHP settings, including the current version at top of the page (read above about the minimum version required) and then many sections regarding the configuration settings and the active modules (read above about the required modules).
If you have access to a web interface to configure your server, like cPanel, then you should be able to find the section to set the current PHP version and the active modules, else if it’s a dedicated/VPS server then you’ll need to make some search on the internet to install the newest version of PHP if required or activate the modules (usually this is just matter of uncommenting or adding a line in php.ini).
Installation
Move the file combu_web.zip from the folder Combu/Install of the Unity project into the root of your web server (if you’re using XAMPP it’s the folder htdocs under the XAMPP folder) or any other sub-directory you want under the web root, and extract it. Now you should have a new folder called combu that contains the web scripts required to run the server, so you can delete the zip file or keep it elsewhere as backup.
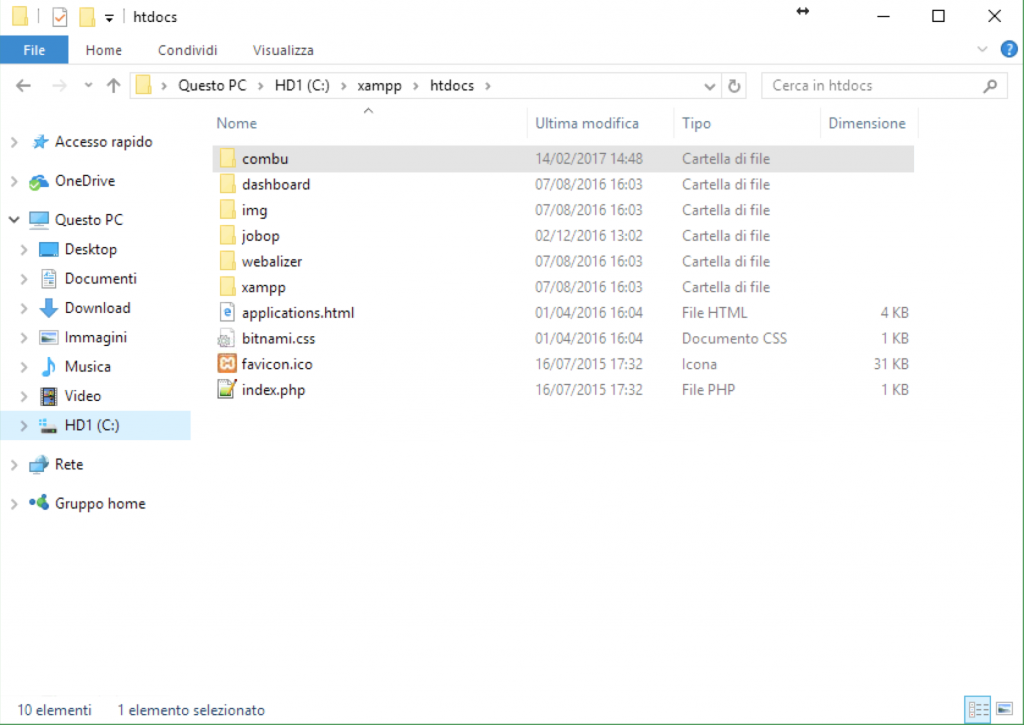
In this example we will assume you have extracted the zip file in the web root folder.
N.B.: if you are using MySql on a Windows machine, then make sure that your MySql server configuration is set to support case-sensitive names for databases, tables and fields (read the documentation at here).
Version 2.x
Now you must edit the file /lib/config.php inside your Combu installation folder and set at least the variables to connect to your MySql server, read this for the full list of the configuration variables.
The next step is to create the database on your MySql server (usually the hosting providers gives you phpMyAdmin or similar web app), select it as active database and run the scripts from the file combu_db.sql to create the tables.
Version 3.x or later
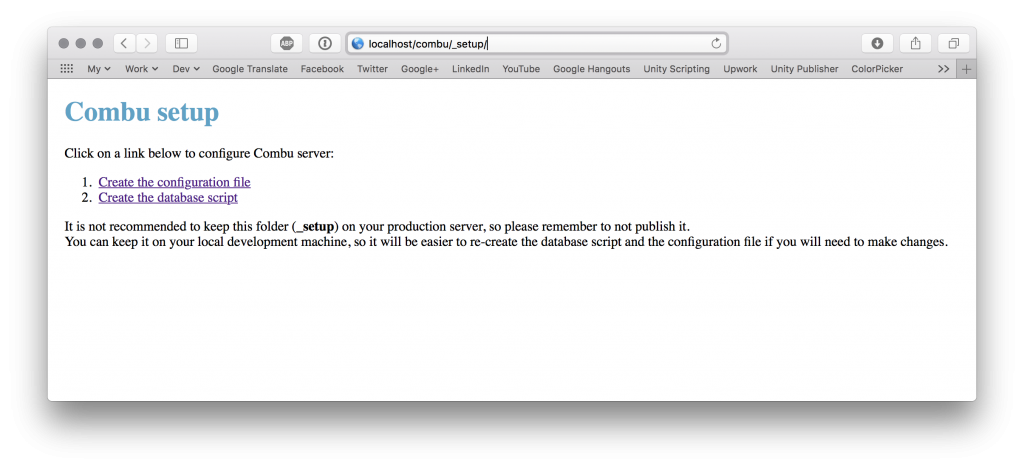
The first step is to configure your newly created Combu server (if you are using XAMPP remember to launch the XAMPP Control Panel and start Apache and MySql services): open your web browser and navigate to http://localhost/combu/_setup
From the setup page you can generate the content of the configuration file and the database scripts in an easy way (we suggest you to follow the numbered order of the steps, as it will offer the chance to save the configuration file automatically (if the folder and file have write permission) and the database scripts executed on what you’ve set in the configuration file (the database must exist before executing the tables creation script, so if it’s a fresh installation with new database then you must create it in phpMyAdmin or other software and then execute the scripts in the _setup page), here is some screenshots.
Customize your config.php
Take a particular look at all configuration settings that you can set in the first link of the setup page (it will help you to create a config.php with all your needs).
For example if you want to enable the email verification after a user has been registered then you need to set both Is Email required for new users and Should verify email registration with activation code in the setup page to YES, it corresponds to have the define for REGISTER_EMAIL_REQUIRED and REGISTER_EMAIL_ACTIVATION set to TRUE.
REGISTER_EMAIL_REQUIRED set to TRUE is also required if you want to use the built-in Reset Password function, since the system will send a random code to the user’s email address that he will enter somewhere in your app UI to set a new password (overload of the method User.ChangePassword).
If you’re having database connection issues when trying to access /admin after a first installation then review the connection settings (GAME_DB_* in your config.php), for example try to use those credentials to access on your phpMyAdmin installation (if on the same web server).
Create an App
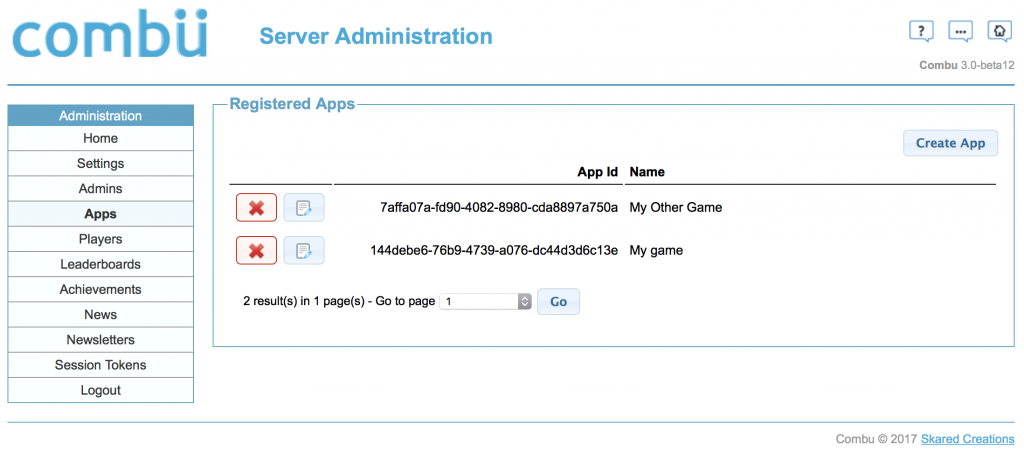
Since version 3.0 you can use the same database for multiple games sharing the same player accounts (yes your users can login with the same credentials on all your apps, no new username/password), while Leaderboards, Achievements and News can also be referenced either to a single App or available to all Apps.
So the first step is to create a new App for your game: navigate to the administration URL on your web browser (i.e.: http://localhost/combu/admin), the very first time you access the administration app it creates default login credentials (admin as both username and password), go to the section Apps and click the button Create App (after saving you will be given the App Id and Secret Key to set in Unity).
Run the demo
If you have followed the previous steps, then you should be ready to run the demo:
- open the scene CombuDemo in Unity (in the folder Combu/Demo/Scenes)
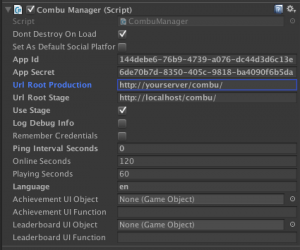
- select the object CombuManager in the Hierarchy panel and set the properties to reflect your web server configuration (if you are running the server like this example at http://localhost/combu then you only need to enable the checkbox Use Stage, else also edit the property Url Root Stage to your Combu folder URL), and set the App Id and App Secret that you received in the web administration
- hit Play in the editor
Integration in existing project
Once you have imported the package into your existing project, you can attach your UI to Combu by using the methods to login and register accounts (you will find them in CombuDemoScene.cs and CombuDemo.cs).
An example of account registration:
User user = new User();
user.userName = "username";
user.password = "password";
user.customData["my-custom-property"] = "myvalue";
user.Update((bool success, string error) => {
   Debug.Log("success: " + success + " -- error: " + error);
});
An example of login:
CombuManager.platform.Authenticate("username", "password", (bool success, string error) => {
   if (success)
      Debug.Log("Login success: ID " + CombuManager.localUser.id);
   else
      Debug.Log("Login failed: " + error);
});
You can also create your own class for users to help in wrapping your custom properties into the the Hashtable customData of User class and use your class with the method overload Authenticate<T> to store the user object as an instance of your custom User subclass and can safe explicitly cast to it later.
Take a look at the API documentation for more examples and code.
First time installation on your production server
When you’re ready to publish on your production server, you will upload the Combu folder to your server and edit the database connection constants in /lib/config.php (the defines called GAME_DB_*) to access your production database, then you have two ways to create the database tables on your production server:
- either use phpMyAdmin (or any other software to manage MySql) to export the tables (data is not required, but remember to not include the values of the AUTOINCREMENT columns in the export options) of your Combu database from your local server to clipboard and then execute it on phpMyAdmin of your production server
- or upload the folder _setup to your production server, then navigate to http://yourserver/yourcombu/_setup and click the link to create the database tables (here you can either execute the queries on your database or copy them and paste on phpMyAdmin), when you have done then delete the folder _setup from your production server
